
go to Layout>Edit HTML
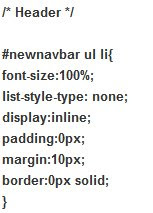
find the Header section and make it look like this (don't delete anything that will follow this text, just add it in starting at #newnavbar):
don't want to type all that? I couldn't put it in a blog post without blogger actually trying to apply it, go here and scroll down to Text Link Menu Navigation Bars under number 1: Simple Navigation Bar to copy and paste
then find this (way down near the bottom):
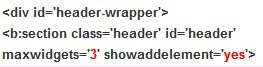
in the last line, change the 1 to 3 and the no to yes
then look for this (just under that):
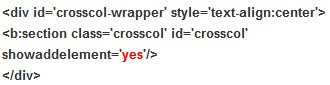 change that no to a yes
Save your Template
Now go back to Page Elements (still under the Layout tab)
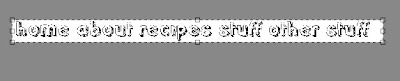
you'll have two new Add a Gadget bars (over and under your header). pick one and choose the HTML/Javascript type. now it's decision time. you can either just have easy word links that will be your blog's font or your own homemade word links. that is what I did. I designed word tabs in photoshop, cropped them all uniform and hosted them at flickr. so they look like this (click that link to see):
wow, I bet that was thrilling
if you just want word tabs in the font your blog uses, use this (again, use this link and find it. sorry it's a slight pain but I'm not advanced like that guy):

but if you want to design your own image tabs or do the font work in photoshop and use that image, you'll need this:

just copy whichever big chunk you need (the text or the images) into the content and Save. now you just have some customization to do.
*tip for making your own word tabs (or using images)=type all the words you'll want in one horizontal line. this keeps them the same size and spacing on the bottom and top. then crop your image down to a long strip.
 you will have to separate each word, but before you do that, duplicate the image. use that duplicate to crop out the first word. when you do crop stay to the very top and bottom of the image. even if there is extra white space. just try to stay close to the borders of the first and last letter. this will keep your words even. save it. then repeat. put all these images into flickr or photobucket or something where they are each given their own url and put onto a page like this:
The next stuff I'm showing is just what my html currently looks like. I'm into figuring things out that way so if it helps you, super. Don't actually use the text from this part or your tabs will basically be my tabs, they'll look the same and point people to my links.

once all of your own info is there, you might need some slight adjustments so things look right. that first Header section that we added to the template lets you. The font size can be changed by altering the 100% that's there (not images of fonts, just fonts if you used the simpler way). I had to go in and play with the padding until my words were spaced how I wanted them. I think I ended up with 11px or something.
if you add these, let me know. I'd love to see and really love to know if my instructions worked.
I found everything I used for my blog edits in this article at Tips for New Bloggers.
There were also several other links (that led me to the helpful one I used) at Just Bloggled
HOORAY! I can't wait to tackle this. You're such a maven.
ReplyDeletewohoo!! Thanks for sharing the directions...even though I am sure it was a pain. I can't wait to try it out...now I just need to come up with what I want my tabs to be...oh the endless possibilities!
ReplyDelete